Activate and Test Application Authentication via Mutual Authentication (mTLS) in APIC 2018.4.1.5 using DP API Gateway [Guest Post by JP Schiller]
Important: This feature is only available since 2018.4.1.5 fixpack for the API Gateway. v5C Gateway supported this earlier.
Purpose is to document the steps needed to authenticate a subscribed Application (app) API call using Mutual Authentication (mTLS) with the Datapower API Gateway.
![Activate and Test Application Authentication via Mutual Authentication (mTLS) in APIC 2018.4.1.5 using DP API Gateway [Guest Post by JP Schiller]](/images/2c2aba00-77be-11e9-8fee-aeeeb7d8a4d0)
Important: This feature is only available since 2018.4.1.5 fixpack for the API Gateway. v5C Gateway supported this earlier.
Purpose is to document the steps needed to authenticate a subscribed Application (app) API call using Mutual Authentication (mTLS) with the Datapower API Gateway.
Official guides from Knowledge Center
You might want to check this out in companion to this note. Note, that most of the SSL related KC docs are from v5 as they have not yet transfered to v2018. They jsut give some addtional information.
- TLS profiles in V5
- Register an application for mTLS in V5 Developer Portal
- Enable API Application Authentication in v2018
Prepare certificates
In this simple test case I used self-signed certs. No Keystore is used. This is just the plain Certs.
- Create Cert request
openssl req -newkey rsa:2048 -new -nodes -keyout apic-client-key-new.pem -out cert_request_csr.pem
- Sign the cert request and create a public client certificate
openssl x509 -req -days 365 -in csr.pem -signkey apic-client-key-new.pem -out public_apic-client_cert.crt
The cert is the complete public cert:
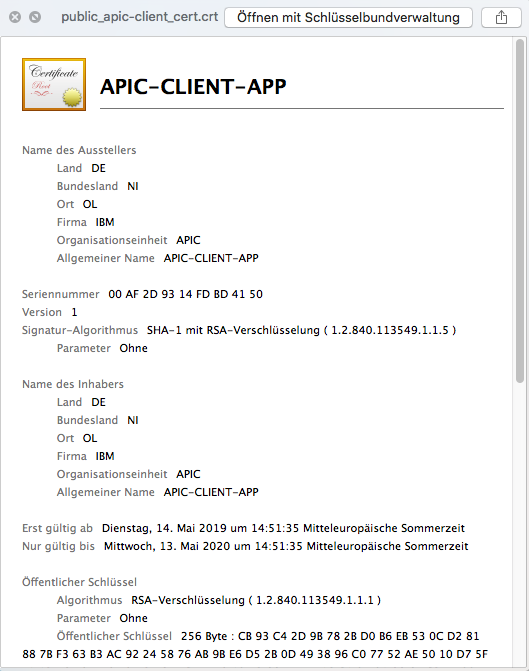
- Cert Extraction
3.1 Open the file public_apic-client_cert.crt in an editor
3.2 Extract the content of the parts between -----BEGIN CERTIFICATE----- and -----END CERTIFICATE----- and remove all line breaks from it.
It is very important that the certificate extract looks like the result in step 3.3
3.2 Original public_apic-client_cert.crt:
-----BEGIN CERTIFICATE-----
XXXXXCCAiACCQCvLZMU/b1BUDANBgkqhkiG9w0BAQUFADBeMQswCQYDVQQGEwJE
RTELMAkGA1UECAwCTkkxCzAJBgNVBAcMAk9MMQwwCgYDVQQKDANJQk0xDTALBgNV
BAsMBEFQSUMxGDAWBgNVBAMMD0FQSUMtQ0xJRU5ULUFQUDAeFw0xOTA1MTQxMjUx
MzVaFw0yMDA1MTMxMjUxMzVaMF4xCzAJBgNVBAYTAkRFMQswCQYDVQQIDAJOSTEL
MAkGA1UEBwwCT0wxDDAKBgNVBAoMA0lCTTENMAsGA1UECwwEQVBJQzEYMBYGA1UE
AwwPQVBJQy1DTElFTlQtQVBQMIIBIjANBgkqhkiG9w0BAQEFAAOCAQ8AMIIBCgKC
AQEAy5PELZt4K9C261MM0oGIe/Njs6ySJFh2q5vm1SsNSTiWwHdSrlAQ11/hE9K5
S5udJGT8dNAZQoiqTRbBCgGQi8NVmUdDoSuwYKnq7tMvWpVDVUpwyhBpiMmlzTgS
t7XYpbbpU/105JeTzg2mMlYHjRgm/zimZY6KDa1uujdHYlXze2CoH8PqfGHjOGVW
62wLGpa3dNzsyyoTdqQNQEyh3I+RgKCMY2O3zRra5nx7/dznMZfucAccy9jJq2YJ
OwtQpJBg0ABYFQN7vOAMNmyE+NcXk73LQvAUYrCBFoL+icQs6/Sy+iHWBkoHyTVa
4zEC3R5DinTgRcR0MH0YarnFFwIDAQABMA0GCSqGSIb3DQEBBQUAA4IBAQCdpV7G
ImlhAyzy14WYtR0bOgASpNGGF0lCRH096gLSGtCvmUxl/e94uWAZOJpzJsKl7luD
0+QUTTCZgXS2gf1XQGLIdvz9pX3URbzGioRwfKQknbwcH/wyIkWypC/m7qFmMhwi
ReUqfK46hAGgo9zPXrNed1U2yH1p94QD8gc7lM37j58JlxMLDzHvFXuxUKeAKYZs
kTOt/b/SF4NoyUqRL+z6gF2c/6nisFPNuOKq24a8cCEMxfcda0FPogQ5MMTdOFfs
tA4qXel1upI4TaAgt5iWCjrgljjKAqtZEi/VDR00xwSrqz7iBw4BYqG/qfhkRoD6
UBX0sRQw41TTx3gVXXXXX
-----END CERTIFICATE----
3.3 Needed extract in one line. Save this for later use in a file extracted_cert.txt Note: !! This certiciate in this example is not working as some parts where marked out with XXXXXXX
XXXXXXCAiACCQCvLZMU/b1BUDANBgkqhkiG9w0BAQUFADBeMQswCQYDVQQGEwJERTELMAkGA1UECAwCTkkxCzAJBgNVBAcMAk9MMQwwCgYDVQQKDANJQk0xDTALBgNVBAsMBEFQSUMxGDAWBgNVBAMMD0FQSUMtQ0xJRU5ULUFQUDAeFw0xOTA1MTQxMjUxMzVaFw0yMDA1MTMxMjUxMzVaMF4xCzAJBgNVBAYTAkRFMQswCQYDVQQIDAJOSTELMAkGA1UEBwwCT0wxDDAKBgNVBAoMA0lCTTENMAsGA1UECwwEQVBJQzEYMBYGA1UEAwwPQVBJQy1DTElFTlQtQVBQMIIBIjANBgkqhkiG9w0BAQEFAAOCAQ8AMIIBCgKCAQEAy5PELZt4K9C261MM0oGIe/Njs6ySJFh2q5vm1SsNSTiWwHdSrlAQ11/hE9K5S5udJGT8dNAZQoiqTRbBCgGQi8NVmUdDoSuwYKnq7tMvWpVDVUpwyhBpiMmlzTgSt7XYpbbpU/105JeTzg2mMlYHjRgm/zimZY6KDa1uujdHYlXze2CoH8PqfGHjOGVW62wLGpa3dNzsyyoTdqQNQEyh3I+RgKCMY2O3zRra5nx7/dznMZfucAccy9jJq2YJOwtQpJBg0ABYFQN7vOAMNmyE+NcXk73LQvAUYrCBFoL+icQs6/Sy+iHWBkoHyTVa4zEC3R5DinTgRcR0MH0YarnFFwIDAQABMA0GCSqGSIb3DQEBBQUAA4IBAQCdpV7GImlhAyzy14WYtR0bOgASpNGGF0lCRH096gLSGtCvmUxl/e94uWAZOJpzJsKl7luD0+QUTTCZgXS2gf1XQGLIdvz9pX3URbzGioRwfKQknbwcH/wyIkWypC/m7qFmMhwiReUqfK46hAGgo9zPXrNed1U2yH1p94QD8gc7lM37j58JlxMLDzHvFXuxUKeAKYZskTOt/b/SF4NoyUqRL+z6gF2c/6nisFPNuOKq24a8cCEMxfcda0FPogQ5MMTdOFfstA4qXel1upI4TaAgt5iWCjrgljjKAqtZEi/VDR00xwSrqz7iBw4BYqG/qfhkRoD6UBX0sRQw41TTx3gVXXXXXX
Create an API in APIC to use Application Authentication
I imported an API “Hello World” which just sets a “hello worl” in the message body. You can use the file helloworld-test_1.0.0_api_gw.yaml
- Login to API Manager
- Go to Develop
- Add API
- Import existing API
- Choose the file: helloworld-test_1.0.0_api_gw.yaml
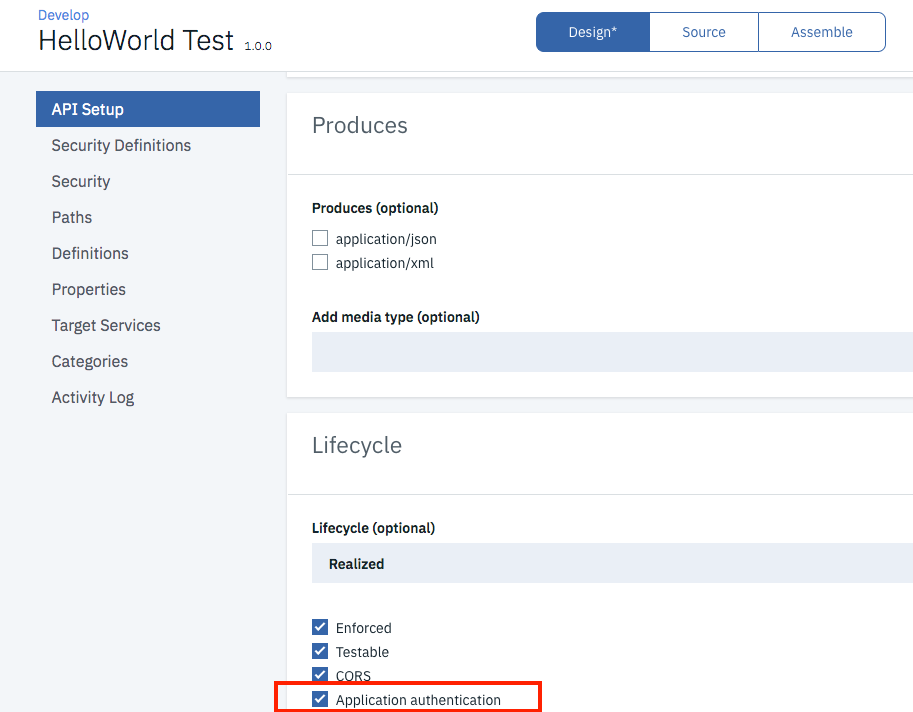
- Edit the API “HelloWorld Test-1.0.0”
- In the “API Setup” scroll down to “Lifecycle”
- Check the box “Application authentication”:
- Save the API.
- Go to the “Security Definitions” in the API View and check that “clientIdHeader” is set as the API-Key. This is important as we need to subcscribe to this API using ClientId (API-Key).
- Go to “Security” and add “clientIdHeader” as the security definition.
- Save the API.

The API is now pre-pared for subcribing by an APP. Application Authentication is now activated. Which can be seen in the swagger code of this API.
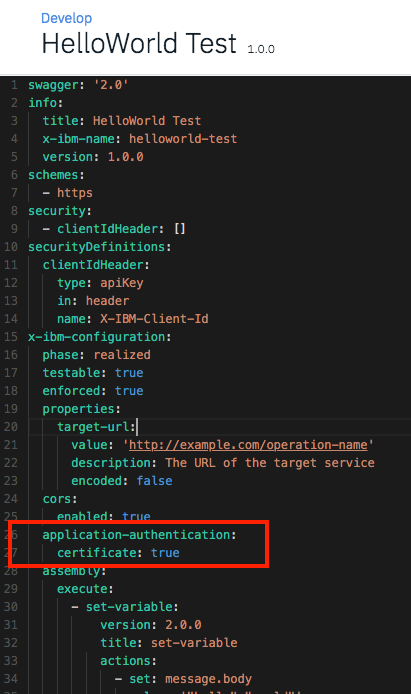
- Publish the API to the Gateway. This is important otherwise an App cannot subcribe to it.
Creating an APP in the Developer Portal providing the certificate
- Login to the Developer Portal with a user of an Consumer Org.
- Go to Apps
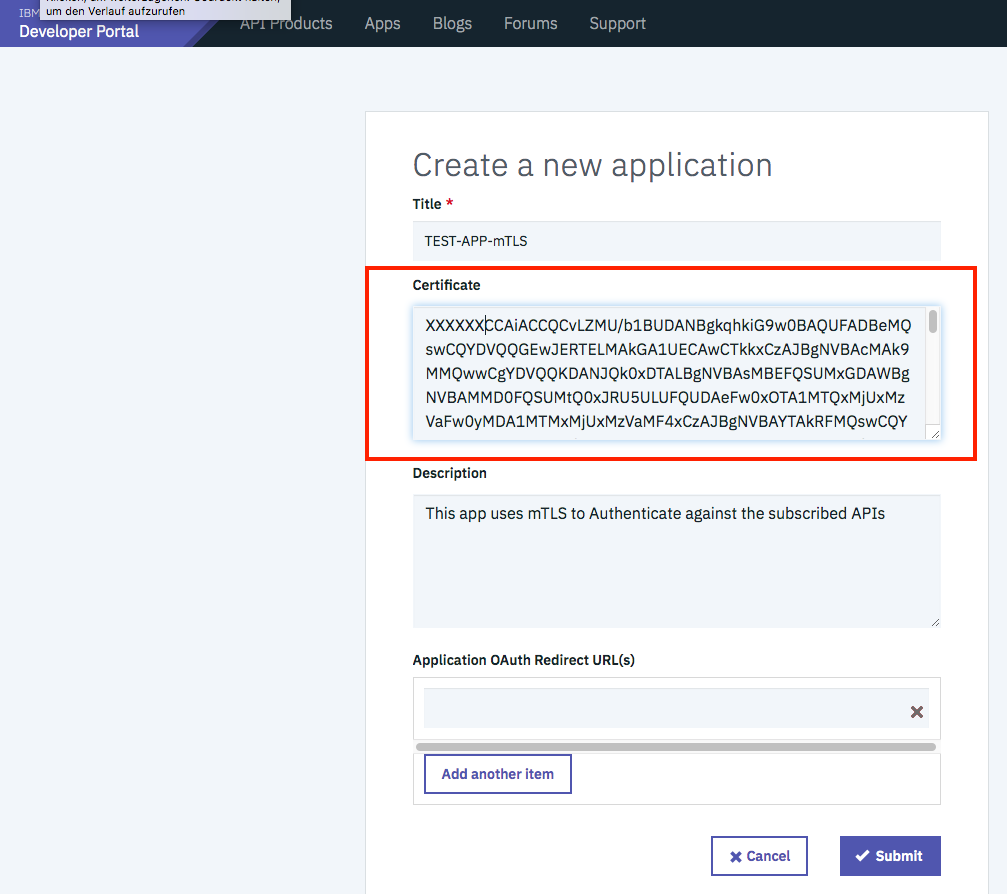
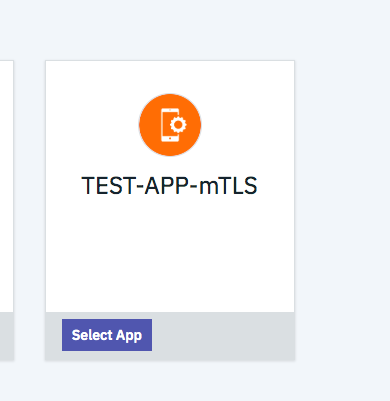
- Create a new App
- You see in the upcoming screen that the Create App wizard now shows a field for a certificate. Paste the cleanup certificate extract (above contents from point 3.2 of the “Prepare Certificates section) without any line breaks.
Note: The certificate in this doc is just an example. You must use your own cert as this has been made unusable using XXXXXXX.
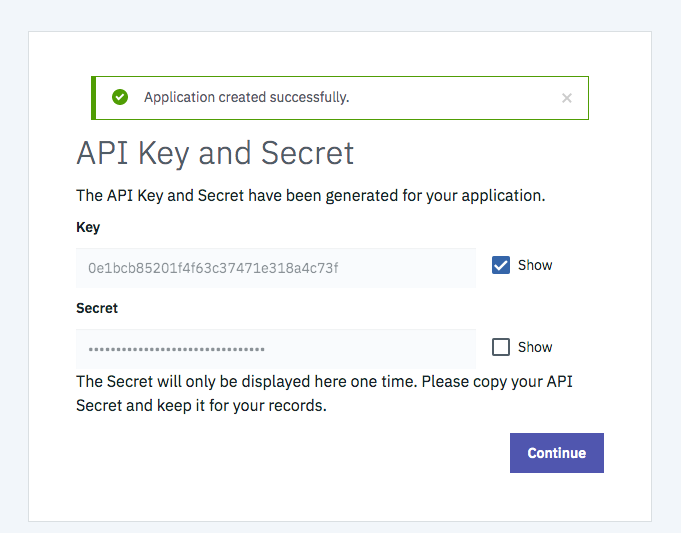
- Save the App. The App now stored the certificate and is stored in APIC to validate an upcoming client request with it.
- Note down the ClientId and ClientSecret which is needed for later use.
Subscribe with the APP to the Product
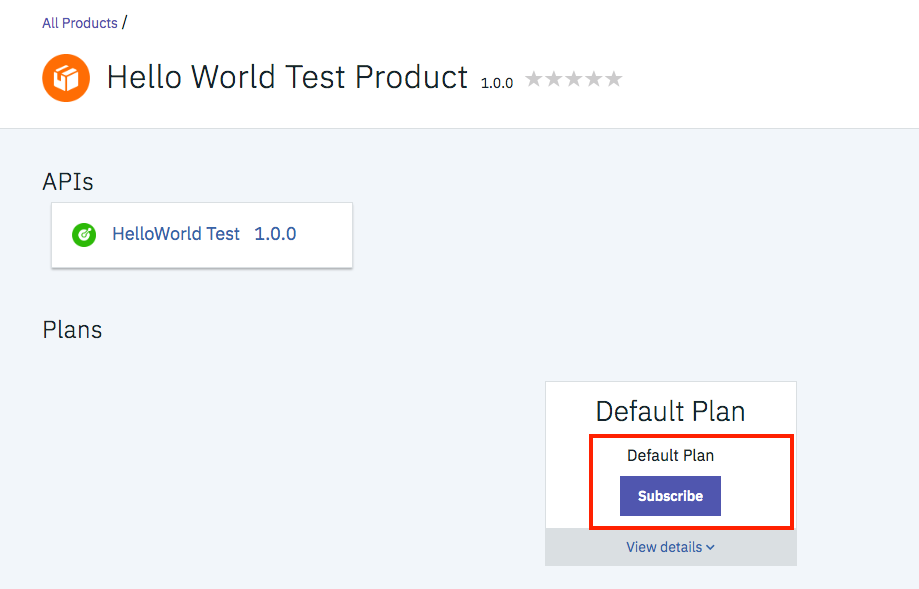
- In the Debeloper Portal navigate to Products
- Choose Hello World Test Product which in includes the API Hello World Test API which was previously secured with “Application Authentication”
- Subscribe to the Plan.
- Select the App you just previously created.
-
Confirm the subscription in the next screen.
-
Done. The app is now subscribed to the API Product.
Create new TLS Server Profile with Mutual Authentication enabled
Without this setting the Datapower API Gateway would not request the Client Application to send a client certificate in the request.
In this example a new TLS Server Profile for API Connect is created just not to make any changes on the “Default TLS Server Profile” which is created during the install. Of course, also the default could be edited.
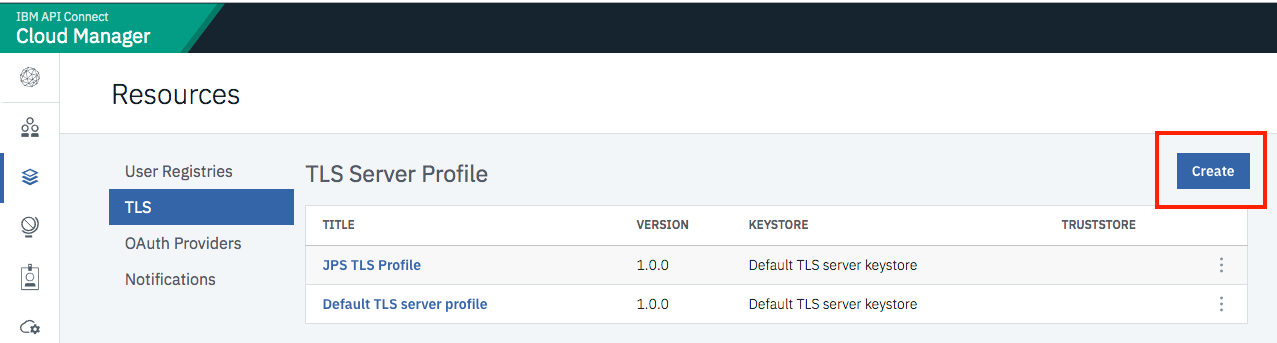
- Login to the Cloud Manager with the user “admin”.
- Go to Ressources –> TLS –> TLS Server Profile –> Create
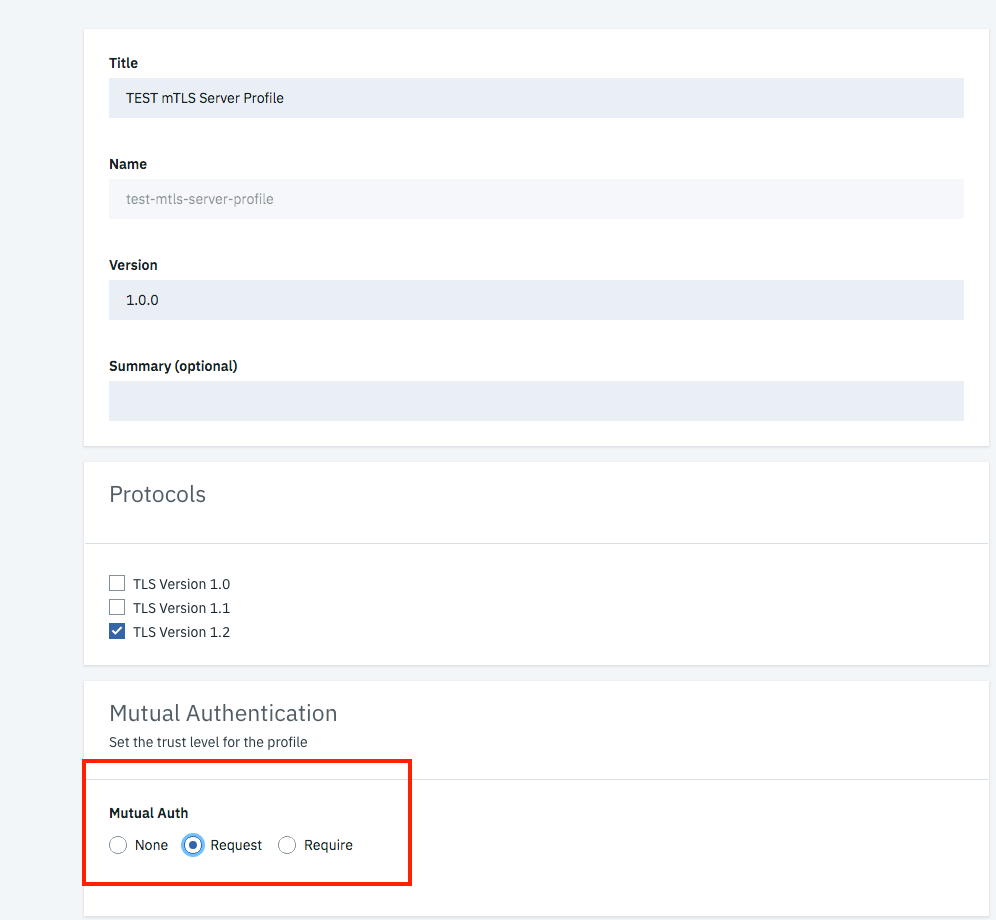
- Create a new TLS Server profile and activate “Mutual Authenticaton” with “Request” as seen on the screenshot. Note: “Request” means the gateway ask the client application to send its certificate, if it does not provide one the request will be send to the gateway without the certificate and can be validated, terminated there.
“Require”: (taken from the DP UI help) Indicate whether to require client authentication during the SSL handshake. When enabled, the handshake is aborted if the client certificate is not provided. When disabled, the request does not fail when there is no client certificate.
- Choose a Keystore to present a server certificate to the application client. I am using the “Default TLS Server Keystore” which was created during the APIC install by default.
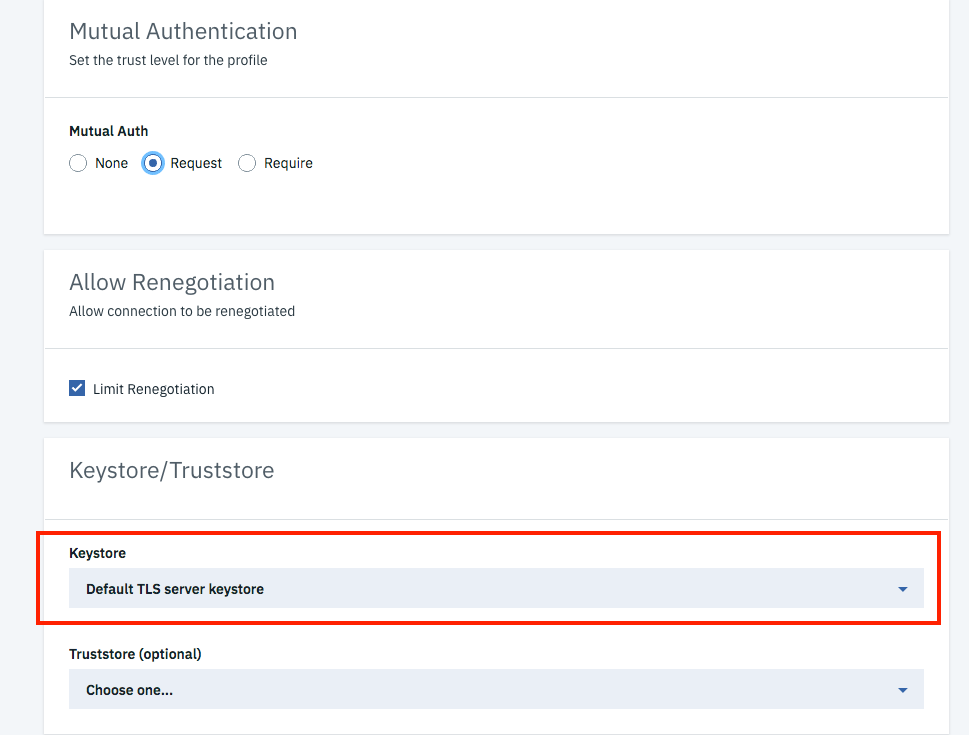
Note: If you want to validate the Application client certificate also against a Truststore than you can choose one. In this example I just want to validate the Application certificate using “Application Authentication” in the API.
- Save the profile.
Assign the Mutual Authentication TLS Server profile to the Datapower API Gateway.
- Login to the Cloud Manager with the “admin” user if not already logged in.
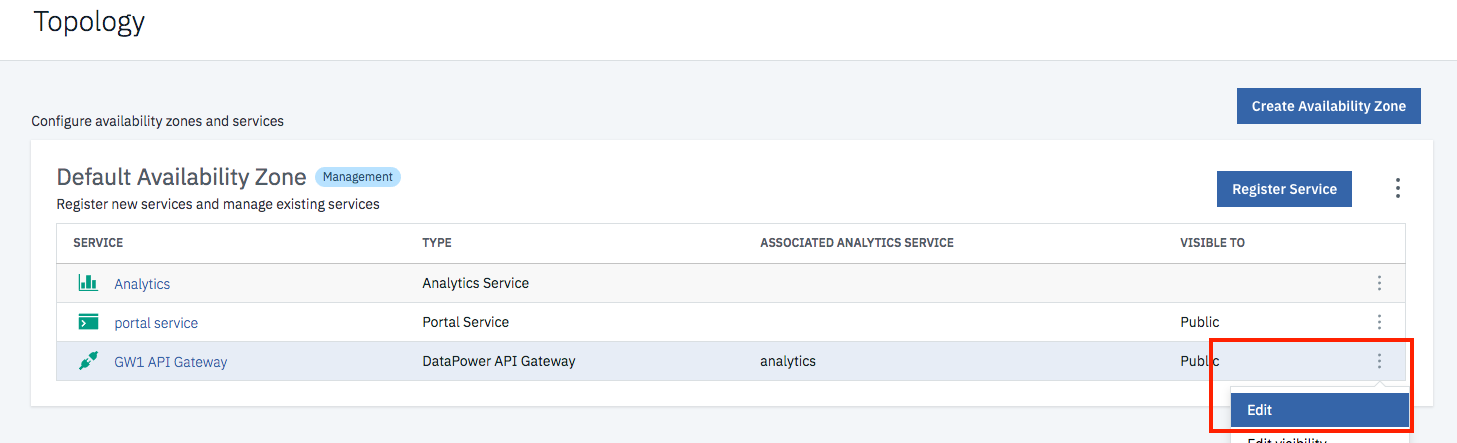
- Go to Topology
-
Edit your Datapower API Gateway service:
-
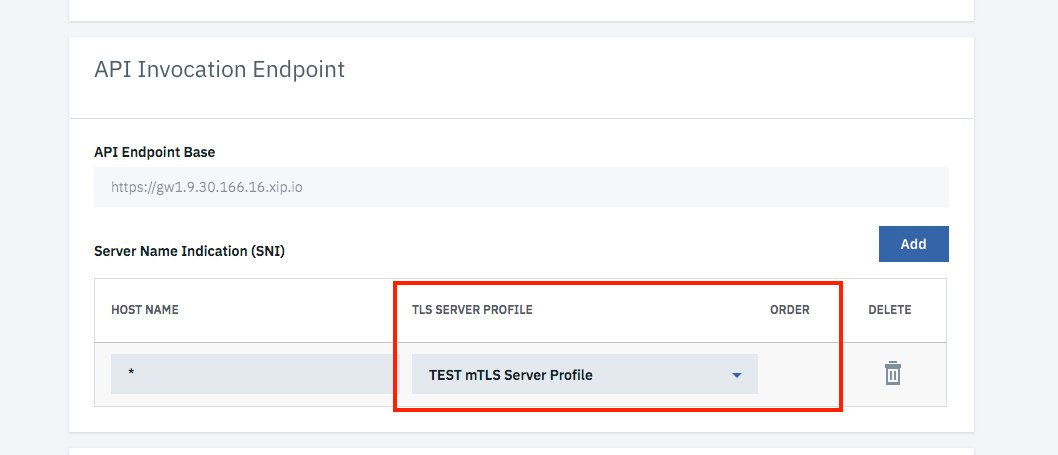
Go to section “API Invocation Endpoint” –> Server Name Indication (SNI) and select the previously created “TEST mTLS Server Profile”:
-
Save. This will take a while and should be indicated with a success window:
-
Now the newly create mTLS Server Profile has been synced to the gateway.
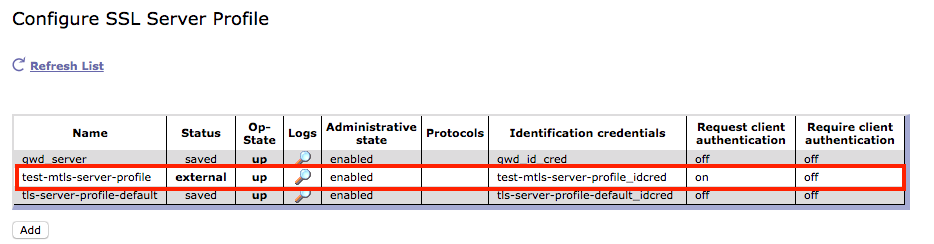
- (Optional) You can doublecheck this e.g. in the Datapower Web UI choosing the Domain “apiconnect” –> Search for “SSL Server Profiles” and the newly created profile is visible. It is marked as “external” meaning created by APIC and it shows that “Request Client Authentication” is activated (mTLS).

Test the API
Test using curl command providing private key and certificate in a file
// curl providing the certificate and private key in a request from a file
curl -k --cert public_apic-client_cert.crt --key apic-client-key-new.pem https://gw1.9.30.166.16.xip.io/jps-org/sandbox/helloworld-test --header 'accept: application/json' --header 'x-ibm-client-id: 0e1bcb85201f4f63c37471e318a4c73f'
// same request just showing -v (verbose) to see SSL Handshaking in the request
curl -vk --cert public_apic-client_cert.crt --key apic-client-key-new.pem https://gw1.9.30.166.16.xip.io/jps-org/sandbox/helloworld-test --header 'accept: application/json' --header 'x-ibm-client-id: 0e1bcb85201f4f63c37471e318a4c73f'

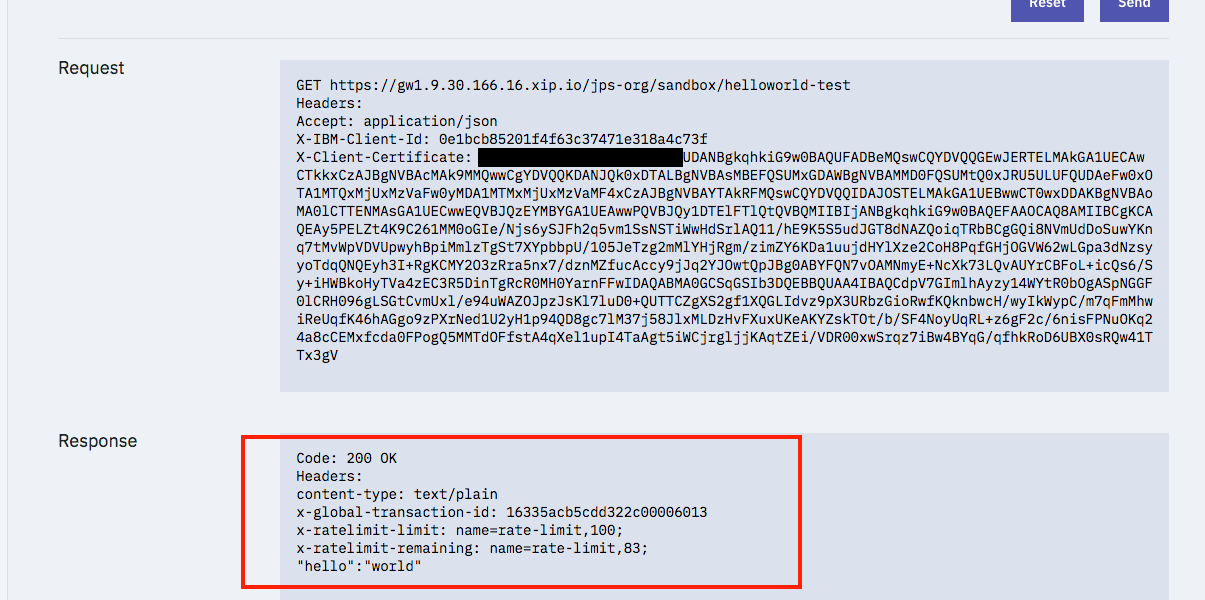
Test using curl command providing certificate in the request header using X-Client-Certificate
` curl -vk https://gw1.9.30.166.16.xip.io/jps-org/sandbox/helloworld-test –header ‘accept: application/json’ –header ‘x-ibm-client-id: 0e1bcb85201f4f63c37471e318a4c73f’ –header ‘X-Client-Certificate: XXXXXXCCAiACCQCvLZMU/b1BUDANBgkqhkiG9w0BAQUFADBeMQswCQYDVQQGEwJERTELMAkGA1UECAwCTkkxCzAJBgNVBAcMAk9MMQwwCgYDVQQKDANJQk0xDTALBgNVBAsMBEFQSUMxGDAWBgNVBAMMD0FQSUMtQ0xJRU5ULUFQUDAeFw0xOTA1MTQxMjUxMzVaFw0yMDA1MTMxMjUxMzVaMF4xCzAJBgNVBAYTAkRFMQswCQYDVQQIDAJOSTELMAkGA1UEBwwCT0wxDDAKBgNVBAoMA0lCTTENMAsGA1UECwwEQVBJQzEYMBYGA1UEAwwPQVBJQy1DTElFTlQtQVBQMIIBIjANBgkqhkiG9w0BAQEFAAOCAQ8AMIIBCgKCAQEAy5PELZt4K9C261MM0oGIe/Njs6ySJFh2q5vm1SsNSTiWwHdSrlAQ11/hE9K5S5udJGT8dNAZQoiqTRbBCgGQi8NVmUdDoSuwYKnq7tMvWpVDVUpwyhBpiMmlzTgSt7XYpbbpU/105JeTzg2mMlYHjRgm/zimZY6KDa1uujdHYlXze2CoH8PqfGHjOGVW62wLGpa3dNzsyyoTdqQNQEyh3I+RgKCMY2O3zRra5nx7/dznMZfucAccy9jJq2YJOwtQpJBg0ABYFQN7vOAMNmyE+NcXk73LQvAUYrCBFoL+icQs6/Sy+iHWBkoHyTVa4zEC3R5DinTgRcR0MH0YarnFFwIDAQABMA0GCSqGSIb3DQEBBQUAA4IBAQCdpV7GImlhAyzy14WYtR0bOgASpNGGF0lCRH096gLSGtCvmUxl/e94uWAZOJpzJsKl7luD0+QUTTCZgXS2gf1XQGLIdvz9pX3URbzGioRwfKQknbwcH/wyIkWypC/m7qFmMhwiReUqfK46hAGgo9zPXrNed1U2yH1p94QD8gc7lM37j58JlxMLDzHvFXuxUKeAKYZskTOt/b/SF4NoyUqRL+z6gF2c/6nisFPNuOKq24a8cCEMxfcda0FPogQ5MMTdOFfstA4qXel1upI4TaAgt5iWCjrgljjKAqtZEi/VDR00xwSrqz7iBw4BYqG/qfhkRoD6UBX0sRQw41TTx3gV’`

Test using Postman test client with a certificate
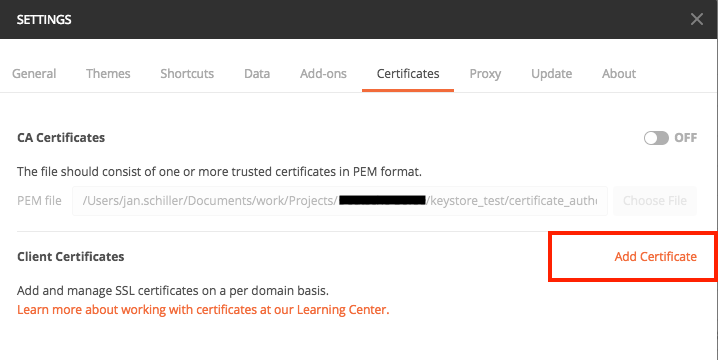
- Open Postman. In this example the following version is used 7.0.9 (7.0.9).
- Go to “Preferences” in the main navigation and select “certificates” tab.
-
Click “Add Certificates”.
- Choose the following values
- Host: gw1.9.30.166.16.xip.io (your Gateway api endpoint)
- CRT: client_certificate_2/public_apic-client_cert.crt (Public certificate)
- Key: client_certificate_2/apic-client-key-new.pem (private key)
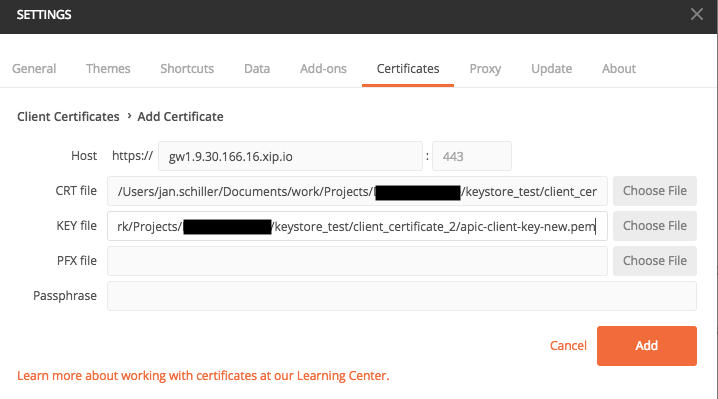
-
Click Add and close the settings.
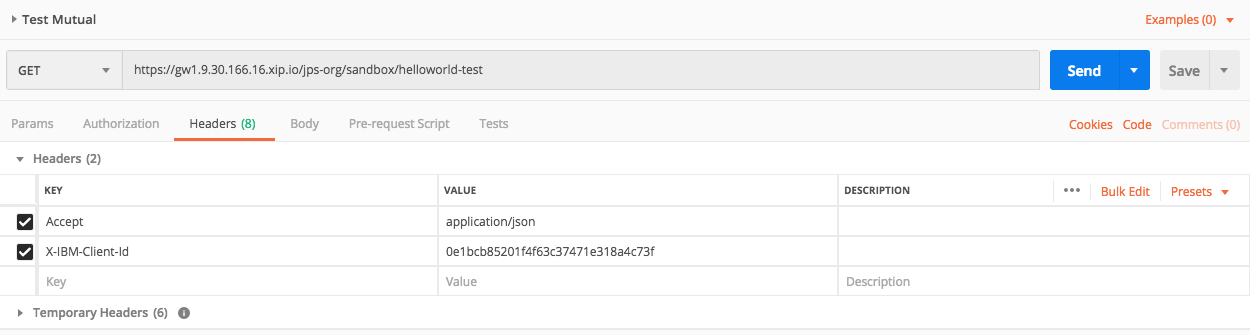
- Test the request with the following parameters:
- Url: https://gw1.9.30.166.16.xip.io/jps-org/sandbox/helloworld-test (API endpoint)
- Add a header: X-IBM-Client-Id with the value of your API Key (ClientId)
- Run the request with the following result.
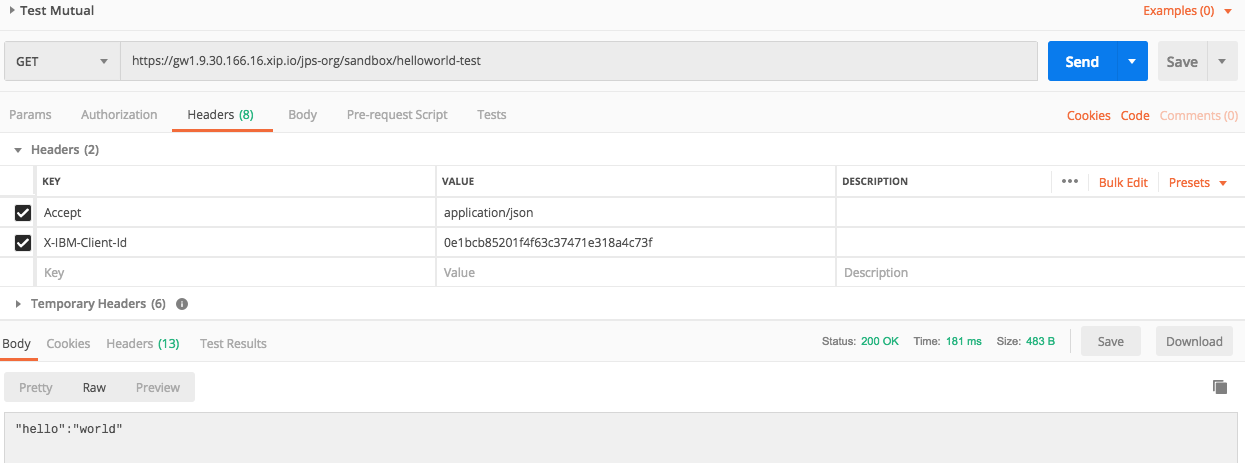
-
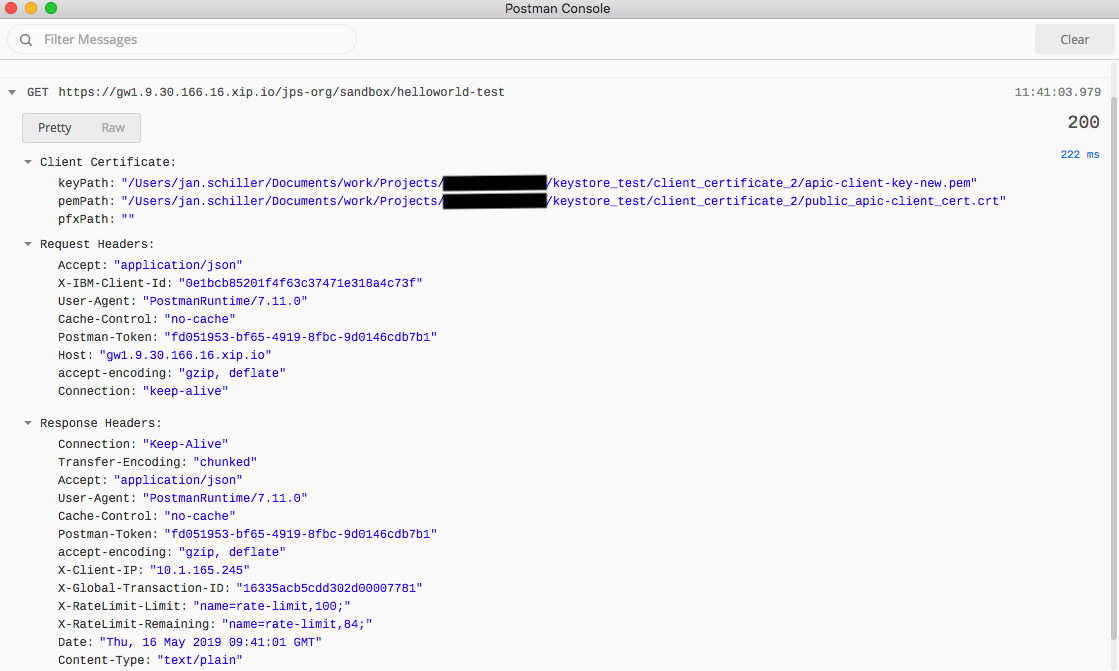
Open the Postman Console (Main Navigation –> View –> Show Postman console
-
Re-run the request and see the results in the postman console.
Test the API in the Developer Portal
Note: Only works if Mutual Authentication in the TLS Server Profile is set to “Request” (as in this example) and NOT to “Require”.
- Login to the Developer Portal with the consumer org which contains the App that was registered before.
-
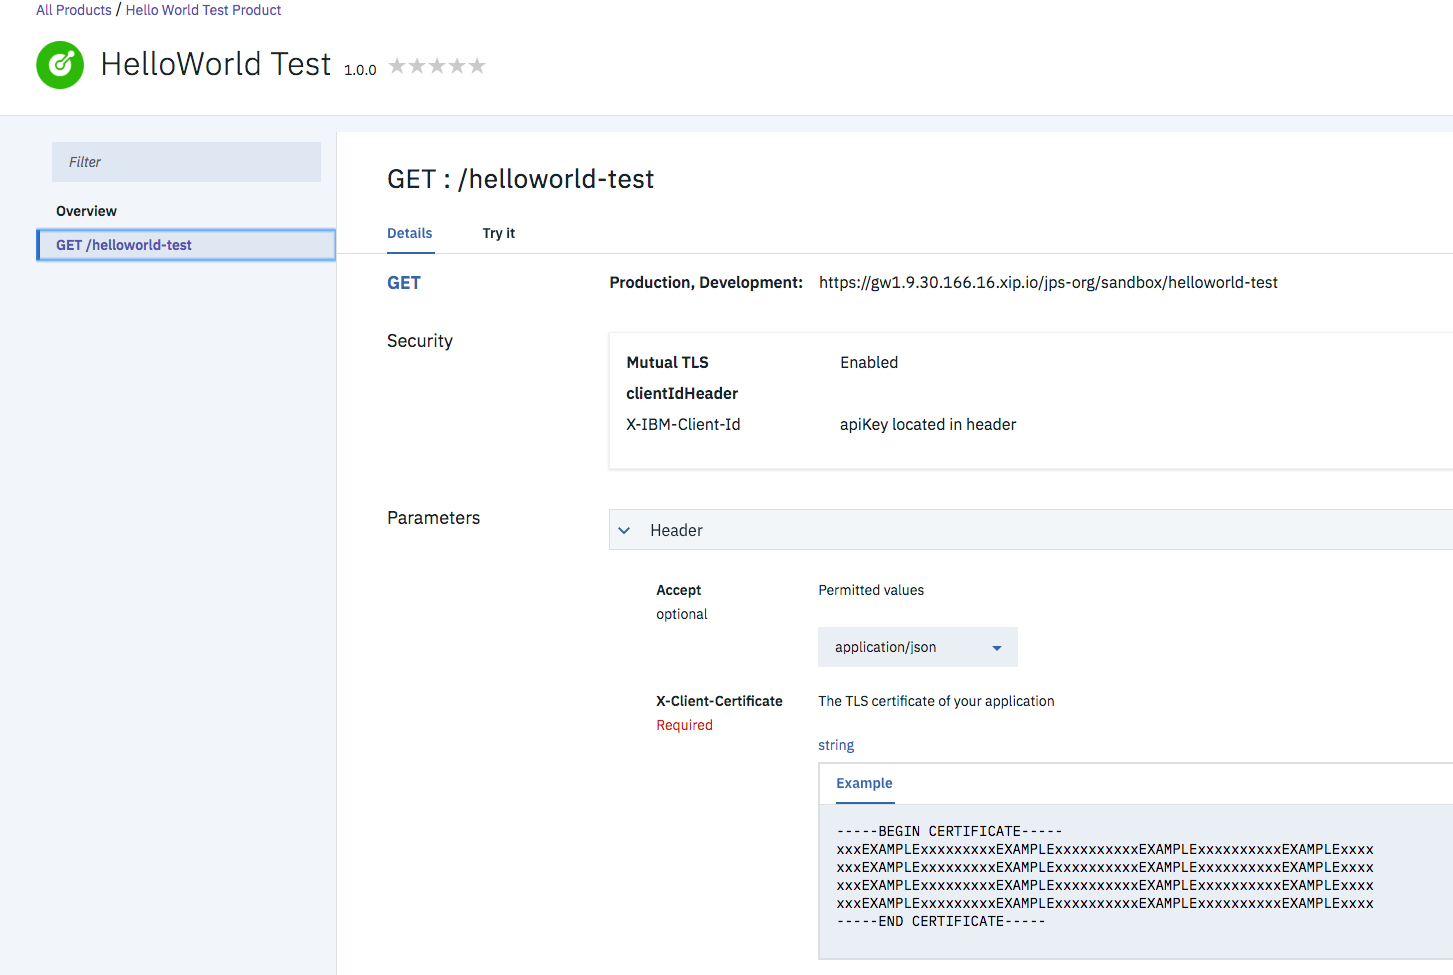
Go to Products –> Hello Worl Test Product –> Hello World Test API Note: You now see that the API request a certificate in the API description and example section.
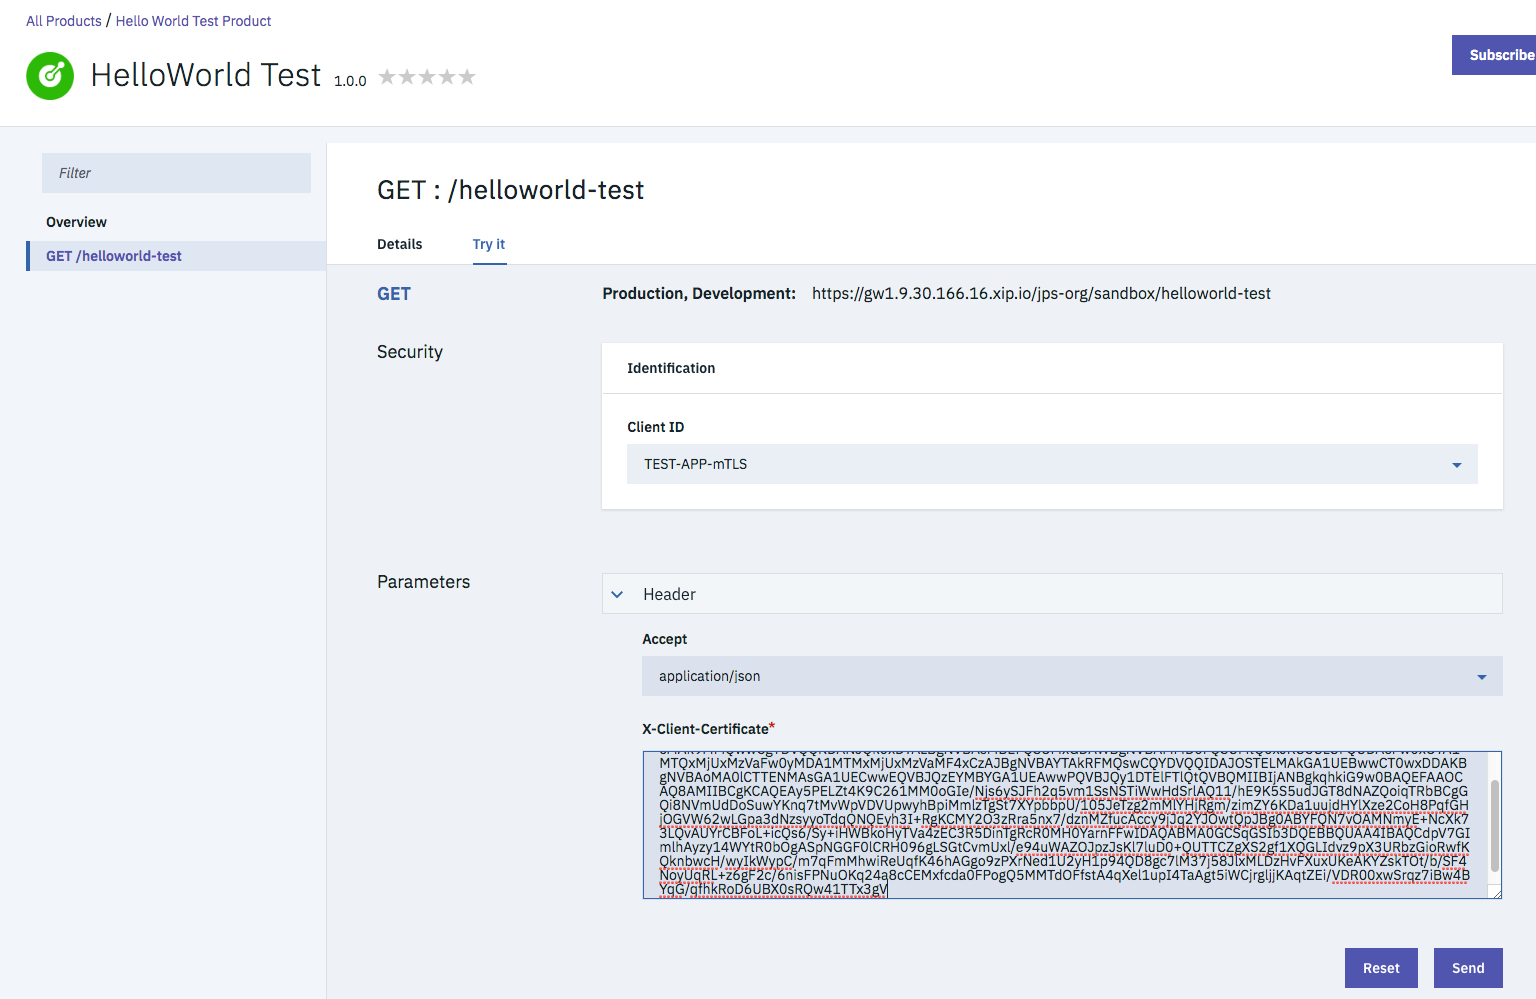
- Select Try-it.
- Paste the certificate extract without any line breaks into the certificate field. The clientId has already been set based on the login and the subscription.
-
Click Send.
-
The following successful result is shown.