

MineCraft PE in IBM BlueMix K8s
•
by
Chris Phillips

Like many parents our there I think my daughters are addicted to MineCraft Pocket Edition. Though we have had a lot of fun building stuff together.
Recently I looked at trying to run my own server so I can play with them when I am away for work.
As a Developer I have access to a free BlueMix account and decided this would be a great time to learn the new HA Autoscaling Docker container system that is K8s. (Sign up her https://console.bluemix.net)
Bear in mind this article wont talk about scaling as the the MineCraft container you will build will not be stateless. I hope to take a look at making it more stateless in the future.
The first thing we need is the server code. I used the Nukkit 3rd party server. https://github.com/Nukkit/Nukkit
Clone and Compiling
Please Note I had to modify the source to make it work. I am sure people more knowledgeable of the code will tell my why this change is not needed.
Firstly I checked out the code
git clone https://github.com/Nukkit/Nukkit.git
I changed one variable in src/main/java/cn/nukkit/raknet/server/SessionManager.java on line 45
public boolean portChecking = true;
to
public boolean portChecking = false;
The issue I hit was that the UDP Packets did not have the server port correctly specified and so it was not starting a session. (I never want to have to stare at a UDP dump again if i can avoid it)
Now we need to build the code. go to the root directory of the checked out code and run
mvn install
I am assuming you have the maven build tools installed and a JDK.
Congrats you now have a jar file in the target directory.
Dockerization
I then created a docker directory to contain the DockerFile and other important files.
mkdir docker
When you first start the jar file it asks you some initial configuration questions, this is not what we want as we want a non interactive start and so we must precreate the configuration. The easiest way to do this is to run the server code locally and it will then create the files required.
First i recommend you copy the jar file to the docker directory
cp -rf target/nukkit-1.0-SNAPSHOT.jar docker
then to start the server
cd docker
java -jar -Dfile.encoding=UTF8 nukkit-1.0-SNAPSHOT.jar nogui
Answer the initial questions then quit the server. You will see that a server.properties and a nukkit.yml (amongst others) has been created.
We then need to create the DockerFile.
FROM ubuntu:latest
RUN apt-get purge openjdk* &&  apt-get autoremove
RUN apt-key adv --keyserver keys.gnupg.net --recv-keys 5CB26B26 && echo "deb http://www.duinsoft.nl/pkg debs all" |  tee -a /etc/apt/sources.list.d/duinsoft.list && apt-get update
RUN apt-get install -y software-properties-common lsof
RUN add-apt-repository ppa:webupd8team/java && apt-get update
RUN echo "oracle-java8-installer shared/accepted-oracle-license-v1-1 select true" | debconf-set-selections
RUN echo "oracle-java8-installer shared/accepted-oracle-license-v1-1 seen true" | debconf-set-selections
RUN apt-get install -y oracle-java8-installer
RUN apt-get clean
RUN mkdir nukkit
COPY nukkit-1.0-SNAPSHOT.jar /nukkit
COPY server.properties /nukkit
COPY nukkit.yml /nukkit
COPY run.sh /nukkit
EXPOSE 8080
CMD sh /nukkit/run.sh
I prefer to start scripts from a shell script rather then directly from the DockerFile so I created a run.sh
#!/usr/bin/bash
cd /nukkit && java -jar -Djava.net.preferIPv4Stack=true -Dfile.encoding=UTF8 nukkit-1.0-SNAPSHOT.jar nogui
In the future if i need to enable additional debugging this run script can easily be extended.
I am using the UK BlueMix server and so i set the docker tag to the following
docker -t registry.eu-gb.bluemix.net/cminion/minecraft:0.01 .
Logging into BlueMix
bx login
or if you are an IBMer
bx login --sso
Creating the Container Registry Namespace
bx cr --namespace-add <NAMESPACE>
In my examples i use the namespace cminion.
Pushing the image to the Container Registry
Now we can push the image to BlueMix
docker push
When this is complete we can validate it is there with
chris$ bx cr images
Listing images...

REPOSITORY                                     NAMESPACE   TAG    DIGEST         CREATED        SIZE     VULNERABILITY STATUS
registry.eu-gb.bluemix.net/cminion/minecraft   cminion     9      926b984a0062   14 hours ago   517 MB   OK

OK
Deploying to Kubernetes
I am going to assume that you already have a Kubernates cluster deployed. Mine is called myCluster.
Ensure that you the KUBECONFIG variable configured in your environment.
Mine is like below but this will depending on how you configured your cluster .
export KUBECONFIG=/Users/chris/.bluemix/plugins/container-service/clusters/mycluster/kube-config-par01-mycluster.yml
Create a deployment.yml as below
apiVersion: extensions/v1beta1
kind: Deployment
metadata:
  annotations:
    deployment.kubernetes.io/revision: "1"
  generation: 1
  labels:
    run: mcnew
  name: mcnew
  namespace: default
  selfLink: /apis/extensions/v1beta1/namespaces/default/deployments/mcnew
spec:
  replicas: 1
  selector:
    matchLabels:
      run: mcnew
  strategy:
    rollingUpdate:
      maxSurge: 1
      maxUnavailable: 1
    type: RollingUpdate
  template:
    metadata:
      creationTimestamp: null
      labels:
        run: mcnew
    spec:
      containers:
      - image: registry.eu-gb.bluemix.net/cminion/minecraft:9
        imagePullPolicy: IfNotPresent
        name: mcnew
        ports:
        - containerPort: 19132
          protocol: UDP
        resources:
        terminationMessagePath: /dev/termination-log
      dnsPolicy: ClusterFirst
      restartPolicy: Always
      securityContext:
      terminationGracePeriodSeconds: 30
status:
  availableReplicas: 1
  conditions:
  - lastTransitionTime: 2017-08-03T17:50:22Z
    lastUpdateTime: 2017-08-03T17:50:22Z
    message: Deployment has minimum availability.
    reason: MinimumReplicasAvailable
    status: "True"
    type: Available
  observedGeneration: 1
  replicas: 1
  updatedReplicas: 1
They key things to ensure are correct are
- containerPort: 19132
  protocol: UDP
This is the port the server is configured to run on and it MUST use UDP. ,
- image: registry.eu-gb.bluemix.net/cminion/minecraft:9
This should be the path to your image in the registry.
Once the file is saved you can run
kubectl create -f deployment.yml
then the following to validate is there.
chris$ kubectl get deployment mcnew
NAME DESIRED CURRENT UP-TO-DATE AVAILABLE AGE
mcnew    1     1       1         1        14h
Now we must expose the container. To do this we create a service.yml.
apiVersion: v1
kind: Service
metadata:
  labels:
    run: mcnew
  name: mcnew
  namespace: default
  selfLink: /api/v1/namespaces/default/services/mcnew
spec:
  clusterIP: 10.10.10.39
  ports:
  - nodePort: 31259
    port: 19132
    protocol: UDP
    targetPort: 19132
  selector:
    run: mcnew
  sessionAffinity: None
  type: NodePort
status:
  loadBalancer:
Again please note the protocol must be UDP and the port and target port should be the port MineCraft is running on. The NodePort is the port you will use to connect to your server.
Run the following command to create the service.
kubectl create -f service.yml
The following command will validate the service is running
chris$ kubectl get service mcnew
NAME CLUSTER-IP EXTERNAL-IP PORT(S) AGE
mcnew 10.10.10.39 <nodes> 19132:31259/UDP 15h
In order to get the IP address this is available on you must run
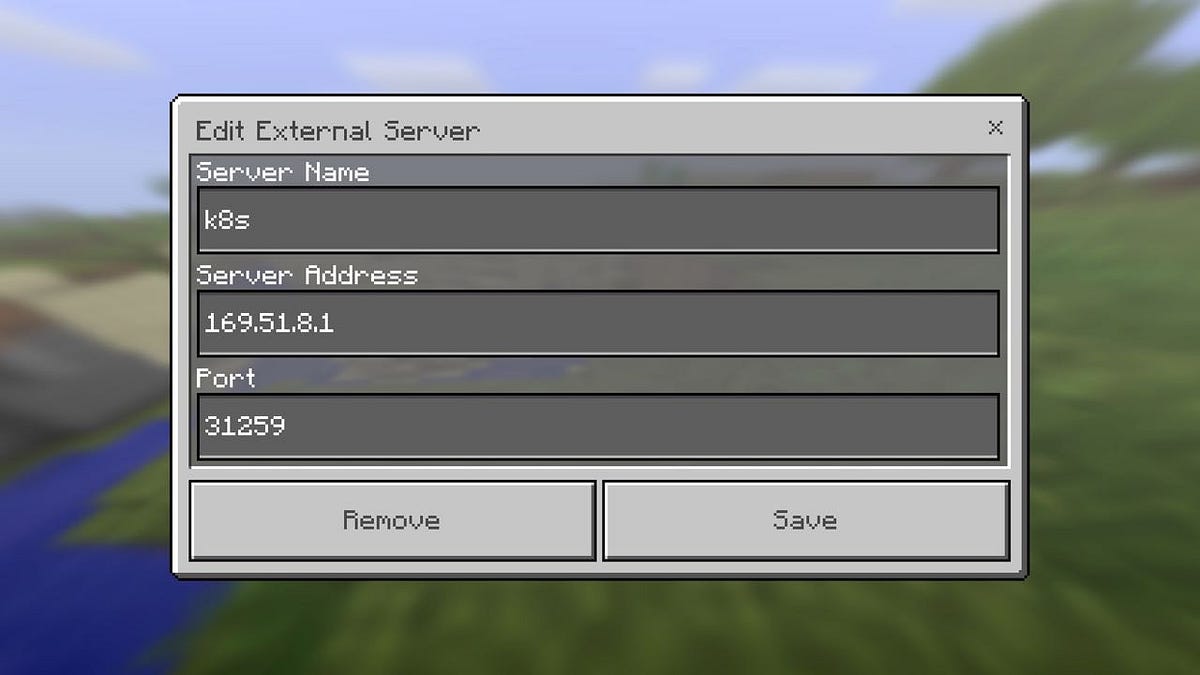
chris$ kubectl get nodes
NAME         STATUS    AGE
169.51.8.1   Ready     10d
Then you load up MineCraft PE on your mobile or console and connect to 169.51.8.1 on port 31259.
This tutorial has shown a very simple way to get a single container running in k8s. This does not make us of the HA or scaling function yet.
By Chris Phillips on August 4, 2017.
Exported from Medium on April 6, 2019.